Now that you have mounted your scope, torqued the base and rings, set it for proper eye relief, leveled the reticle, and bore-sighted it, you are at the final stage of preparing your rifle for use.
First, you need additional gear, a rifle rest like sandbags, some targets, and usually a higher-power spotting scope like 20-40 power.
Sighting in Your Rifle
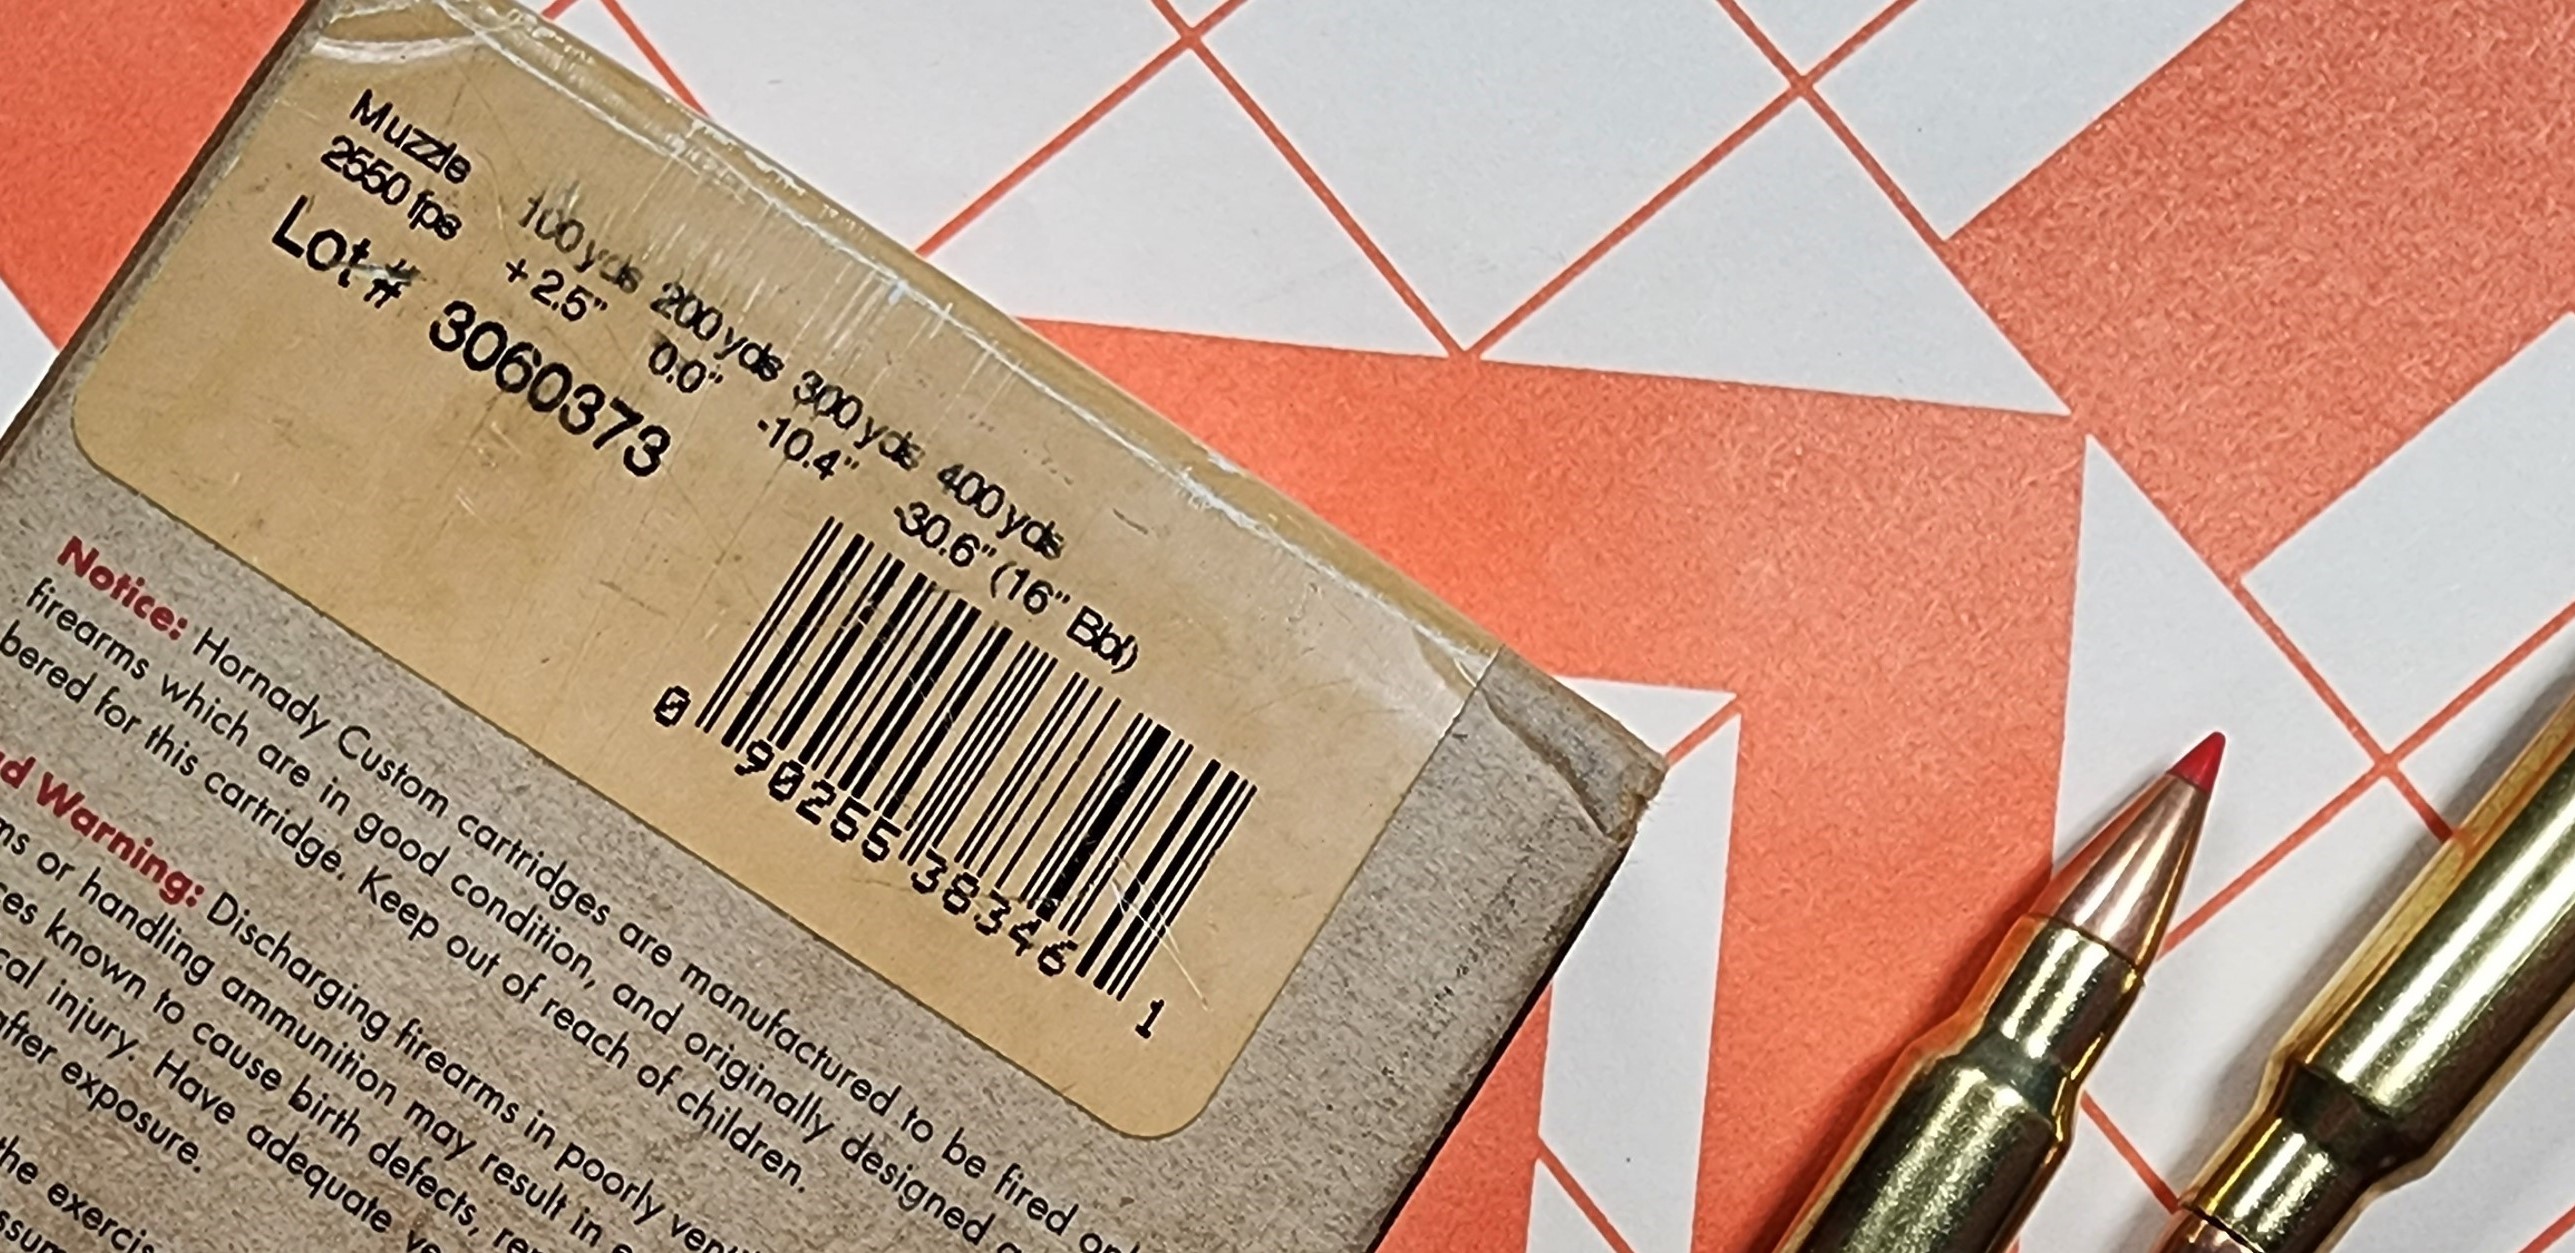
Zeroing your scope is dialing in your reticle so that the point of aim matches the point of impact. Many shooters will set that at 100 yards because most ranges are 100 yards. Most ammo manufacturers have ballistic charts on the back of the ammo box or their website showing the droppage of your bullet over different yardage (or distances) based on what range your rifle is zeroed. Remember that this is based on their rifle, not yours, so that results may vary slightly.
Also, note if you are zeroing a .22 rimfire rifle, you will probably want to zero for a shorter range. I suggest zeroing it for 50 or 75 yards. We will cover that in another article coming soon.
Understanding Point of Aim and Point of Impact
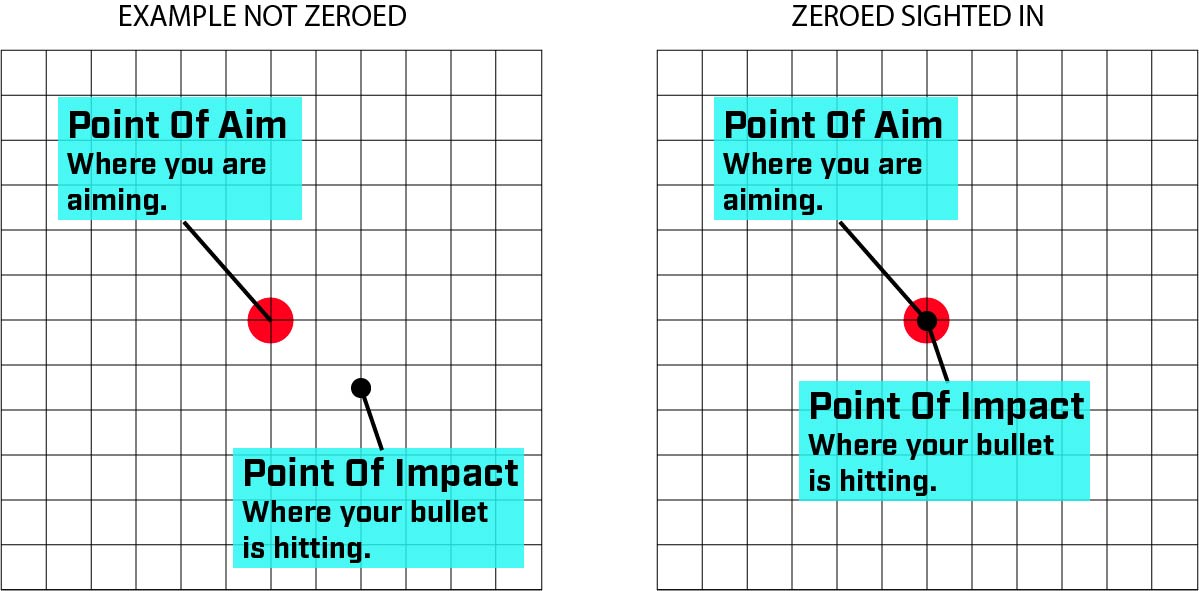
POA (Point of aim) is where you are aiming with the center of your reticle.
POI (Point of Impact) is where the bullet hits the target.
Figure 1.

Zeroing matches the POA to the POI.
Zero at Closer Ranges If you are a New Shooter
For the sake of simplicity in this article, we will be using a 100-yard zero, but if you are a new shooter or have a newly mounted scope, it may be better to start by zeroing at 25 or 50 yards rather than 100 yards. This is because the target is closer and not affected as much by the slightest movement. This will follow the same procedure below, except it will require more clicks to move the reticle one inch on the closer target.
If your scope uses 1/4MOA click and it takes four clicks to move an inch at 100 yards, it will take eight clicks at 50 yards and 16 clicks at 25 yards. To better understand this, if your bullet hits one inch to the right of center at 25 yards, it would hit the target 4 inches to the right at 100 yards.
How to Zero Your Rifle Scope
With your target set up at 100 yards, set your rifle up using a rifle rest-like sandbags designed for shooting to make it as stable as possible. Do not put any pressure under the barrel. Fire your first shot. Note where this shot landed. Allow your barrel to cool in between shots. Fire another shot. Move to step 2 if it is touching or less than an inch from the first shot. If not, fire one more shot. This will give you a group. Use the two shots that are closest together for your point of impact.
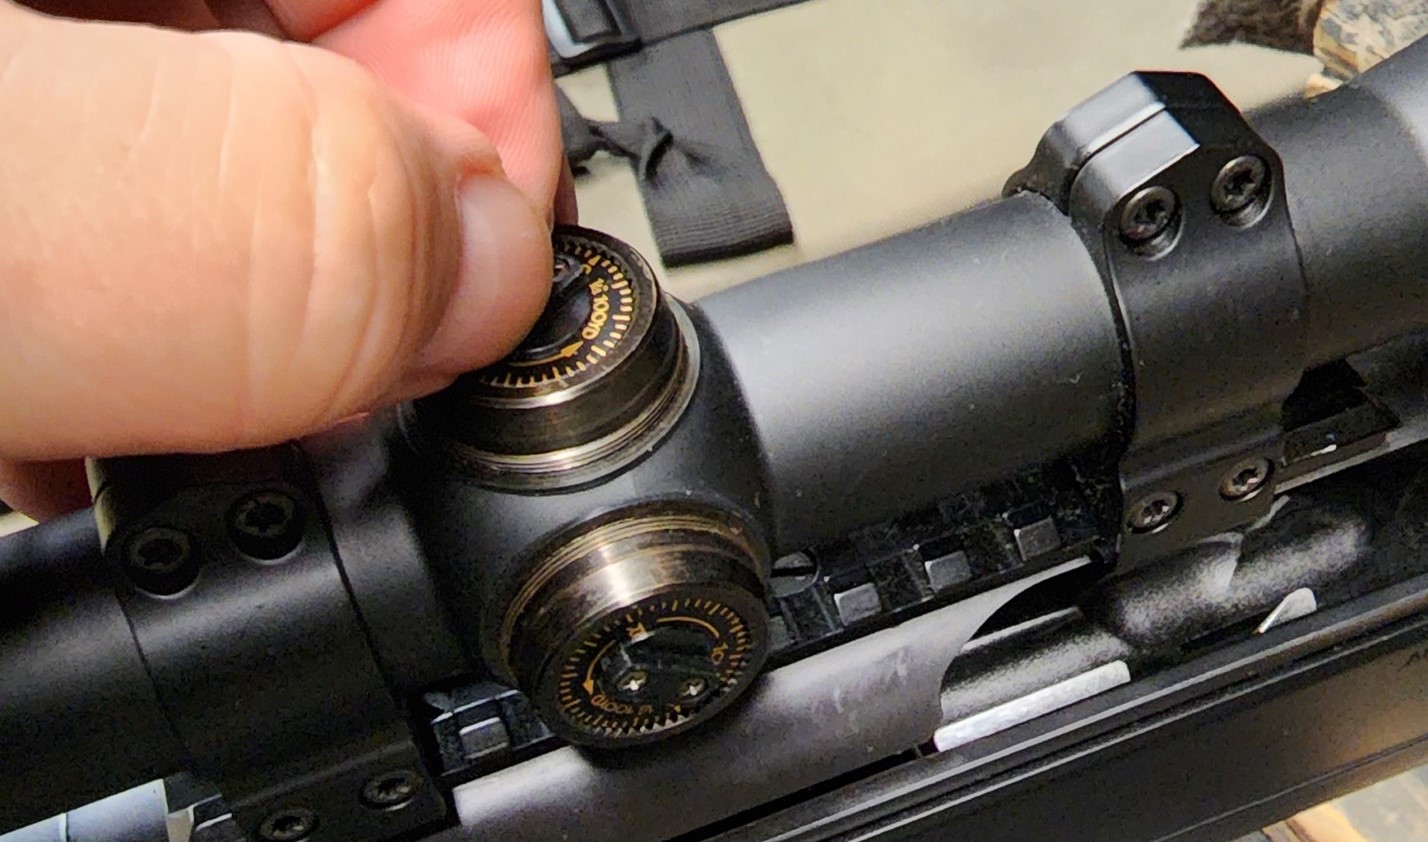
Remove your scope caps and look for the "UP" and "R" with arrow markings.

Understanding Your Windage and Elevation Dials
Once you have a group, unless you got lucky and it is hitting in the bullseye, you must align your point of impact with your point of aim using your scope dials. It is very important to know what your dials are doing so you do not move your point of impact further away from your point of aim.
Here is where people get confused. When you read the dials, you will see "UP" on the elevation dial and an "R" with an arrow on the windage dial. It is essential to note that these markings do not indicate the direction you are moving your reticle (see Figure 1). They indicate the direction of your point of impact. So, if you move your dial in the "UP" direction, you are moving your reticle down, raising your point of impact in the direction of where your bullet will hit.
Scopes will come with different forms of measurements from inches, MOA to MILs. We will use inches or MOA since ¼ MOA at 100 yards equals ¼ inch. Each click will represent a unit of measurement. 1/4″ or 1/8″ MOA/inches, based at 100 yards.
Moving your crosshairs (point of aim) to match where your bullet hits the target (point of impact).
Using Figure 1 as an example if your target is 100 yards and you have 1/4 MOA adjustments and hit two inches to the right and one and a half inches low, you will want to move the windage dial eight clicks "L" (left). This will move your reticle 2 inches right, moving your point of impact 2 inches left, and then 6 clicks "UP" to move your point impact up to match your point of aim.
Then you will want to fire to confirm that you are now in the bullseye by firing a couple more shots. If you are in the bullseye, put the caps back on, and you are done. If not, sometimes some fine-tuning may be necessary depending on how accurate your initial group was versus your new group.
A good rule of thumb is never to adjust the reticle off just one shot. You could be adjusting to a shooter error.
Some Tips on Sighting in a Rifle.
Make sure your bore is clean and dry. Running an oil patch through the bore is common practice before storing it. Make sure to run some dry patches through the bore before sighting it in because the oil may cause your grouping to be inconsistent.
Let your barrel cool off between shots. There is what is termed a cold bore zero. This will be your first shot. As the barrel gets hot, you may find your group size getting bigger.
Make sure you are not putting any strain on the barrel.
F.A.Q.
What if You Want to Zero for 200 Yards but Only Have a 100 Yard Range?

Using the brand's ballistic data from the box or their website, you can zero your rifle for longer ranges using a 100-yard range. Using the data from this box, if a bullet is 2.5 inches high at 100 yards, zero your point of impact to be 2.5 inches above your point of aim at 100 yards so that when you aim for the bullseye center, the bullet groups 2.5 inches above it. Now you are zeroed at 200 yards, but you will be 2.5 inches high at 100 yards. This is a great way to zero a hunting rifle for big game because you can still aim at the center of a vital and hit it at anything 200 yards and under and very little drop compensation for anything out to 300 yards.
How Can I Zero My Rifle if I Don’t Have Access to a 100-Yard Range or Have a Spotting Scope to See My Target That Far Away?
You can sight in at 50 yards or even 25 yards using your ammunition's ballistics. A shooter can sight in at, for example, 25 yards which will put you a little high at 100 yards. Knowing how many inches that will be, you can calculate how many inches low you need to be at 25 yards to be zeroed for 100. You can use this method to zero for 200 yards as well.
For example, with some cartridges, you can zero at 25 yards, putting their point of impact 2-3 inches high at 100 yards, and because your bullet travels at a high arc when zeroed at close range, it will cross back at zero at 200yards give or take a couple of inches. Even though this is not a precise method, knowing your ammo's ballistic data is, you can calculate that, allowing you to hit a 3–5-inch target with no holdover up to 200- 250 yards, depending on what rifle and ammo you are using.
I Had My Rifle Bore-Sighted, but I Am Not Even on Paper
You may need Boresight again. Mechanical bore sighters are not always spot on. Suppose you are at the range and do not have a bore sighter. See our video on How to field Boresight your rifle without a boresight tool - YouTube or move the target closer. Moving the Target to 25 yards may put you on paper.
I Can’t Seem to Get My Rifle to Group Well Enough to Zero
Allow the barrel to cool off between shots. This is an excellent time to practice dry fire while your barrel is cooling. Dryfire is where you practice shooting without ammo. Check with your manufacturer to ensure dry firing will not damage your rifle or use snap caps. Practicing with snap caps is an excellent way to improve trigger control and prevent flinching, which is a significant cause of inconsistent groups. If you are a new shooter, it may take more practice to become proficient. Dry fire practice is one of the best methods for learning trigger control. Remember to squeeze, not pull the trigger. Breath in, Breath out, and hold and squeeze.
RELATED ARTICLES.
Why a Rifle Loses Zero and How to Keep it Zeroed - Warne Scope Mounts


