


7902M Precision Bipod, Arca Rail Interface
MSRP:
$453.99
Was:
$453.99
Now:
$364.99
(You save
$89.00
)
- SKU:
- 7902M
- Brand:
-
Skyline®
- Shipping:
- DUE TO SUPPLY CHAIN ISSUES ITEM MAY SHIP WITH ALTERNATE FOOT SHOWN IN CLOSE UP
- Adustable from shooting position.
- Rapid Leg Deployment.
- Competition Ready.

Key Features:
Best Uses:
Description
Picatinny or ARCA versions available.
Designed and MADE IN USA

This product contains chemicals known to the State of California to cause cancer and reproductive harm. For more information, go to www.P65Warnings.ca.gov
DUE TO SUPPLY CHAIN ISSUES ITEM MAY SHIP WITH ALTERNATE FOOT SHOWN IN CLOSE UP
Bipod Perfection Achieved The Warne® Skyline® Precision Bipod is the most functional, ergonomic and strongest bipod on the market today. Designed to attach to your picatinny rail, the Skyline bipod allows the shooter to make quick, one-handed height adjustments, as well as smooth cant and panning ability for use on uneven terrain or less than ideal positions.
Line up your shot perfectly with an Arca rail bipod from Warne Scope Mounts.
The Warne Skyline Precision Bipod features a patent-pending design that offers you the most flexible, stable performance on the market. You'll get one-hand adjustability, rapid leg deployment and incredible versatility for uneven terrain in this 7902M bipod. Made in the U.S., it features 6061 T6 and 7075 T6 aircraft-grade aluminum with steel components to reinforce high-use areas.
- Patent Pending Design
- Quickly attaches to any Picatinny Type Rail
- One Hand adjustability
- Rapid leg deployment from horizontal to 90°
- 3 Position Leg Rotation: 0°, 45°, 90°
- Leg Extension Min Height 6.9 inch/Max Height 9.1 inch
- 22° Total Cant/44° Total Pan
- Weighs 16.5 oz
- ARCA Swiss Rail Bipod pn 7902M
- Designed and MADE IN USA
Perfect for use in PRS, NRL, Precision Rifle Series
Warne is a Proud Sponsor of the PRS


Specifications
- Part Number:
- 7902M
- Finish Color:
- Matte Black
- Weight:
- 16.5 oz
- Material:
- 7075 Aluminum
- Fits:
- ARCA Rail
Related Products


Installation Instructions
Always verify that your firearm is UN-LOADED before performing any service on it. ONLY ADJUST BIPOD WITH MUZZLE POINTING IN A SAFE DIRECTION, DOWN RANGE
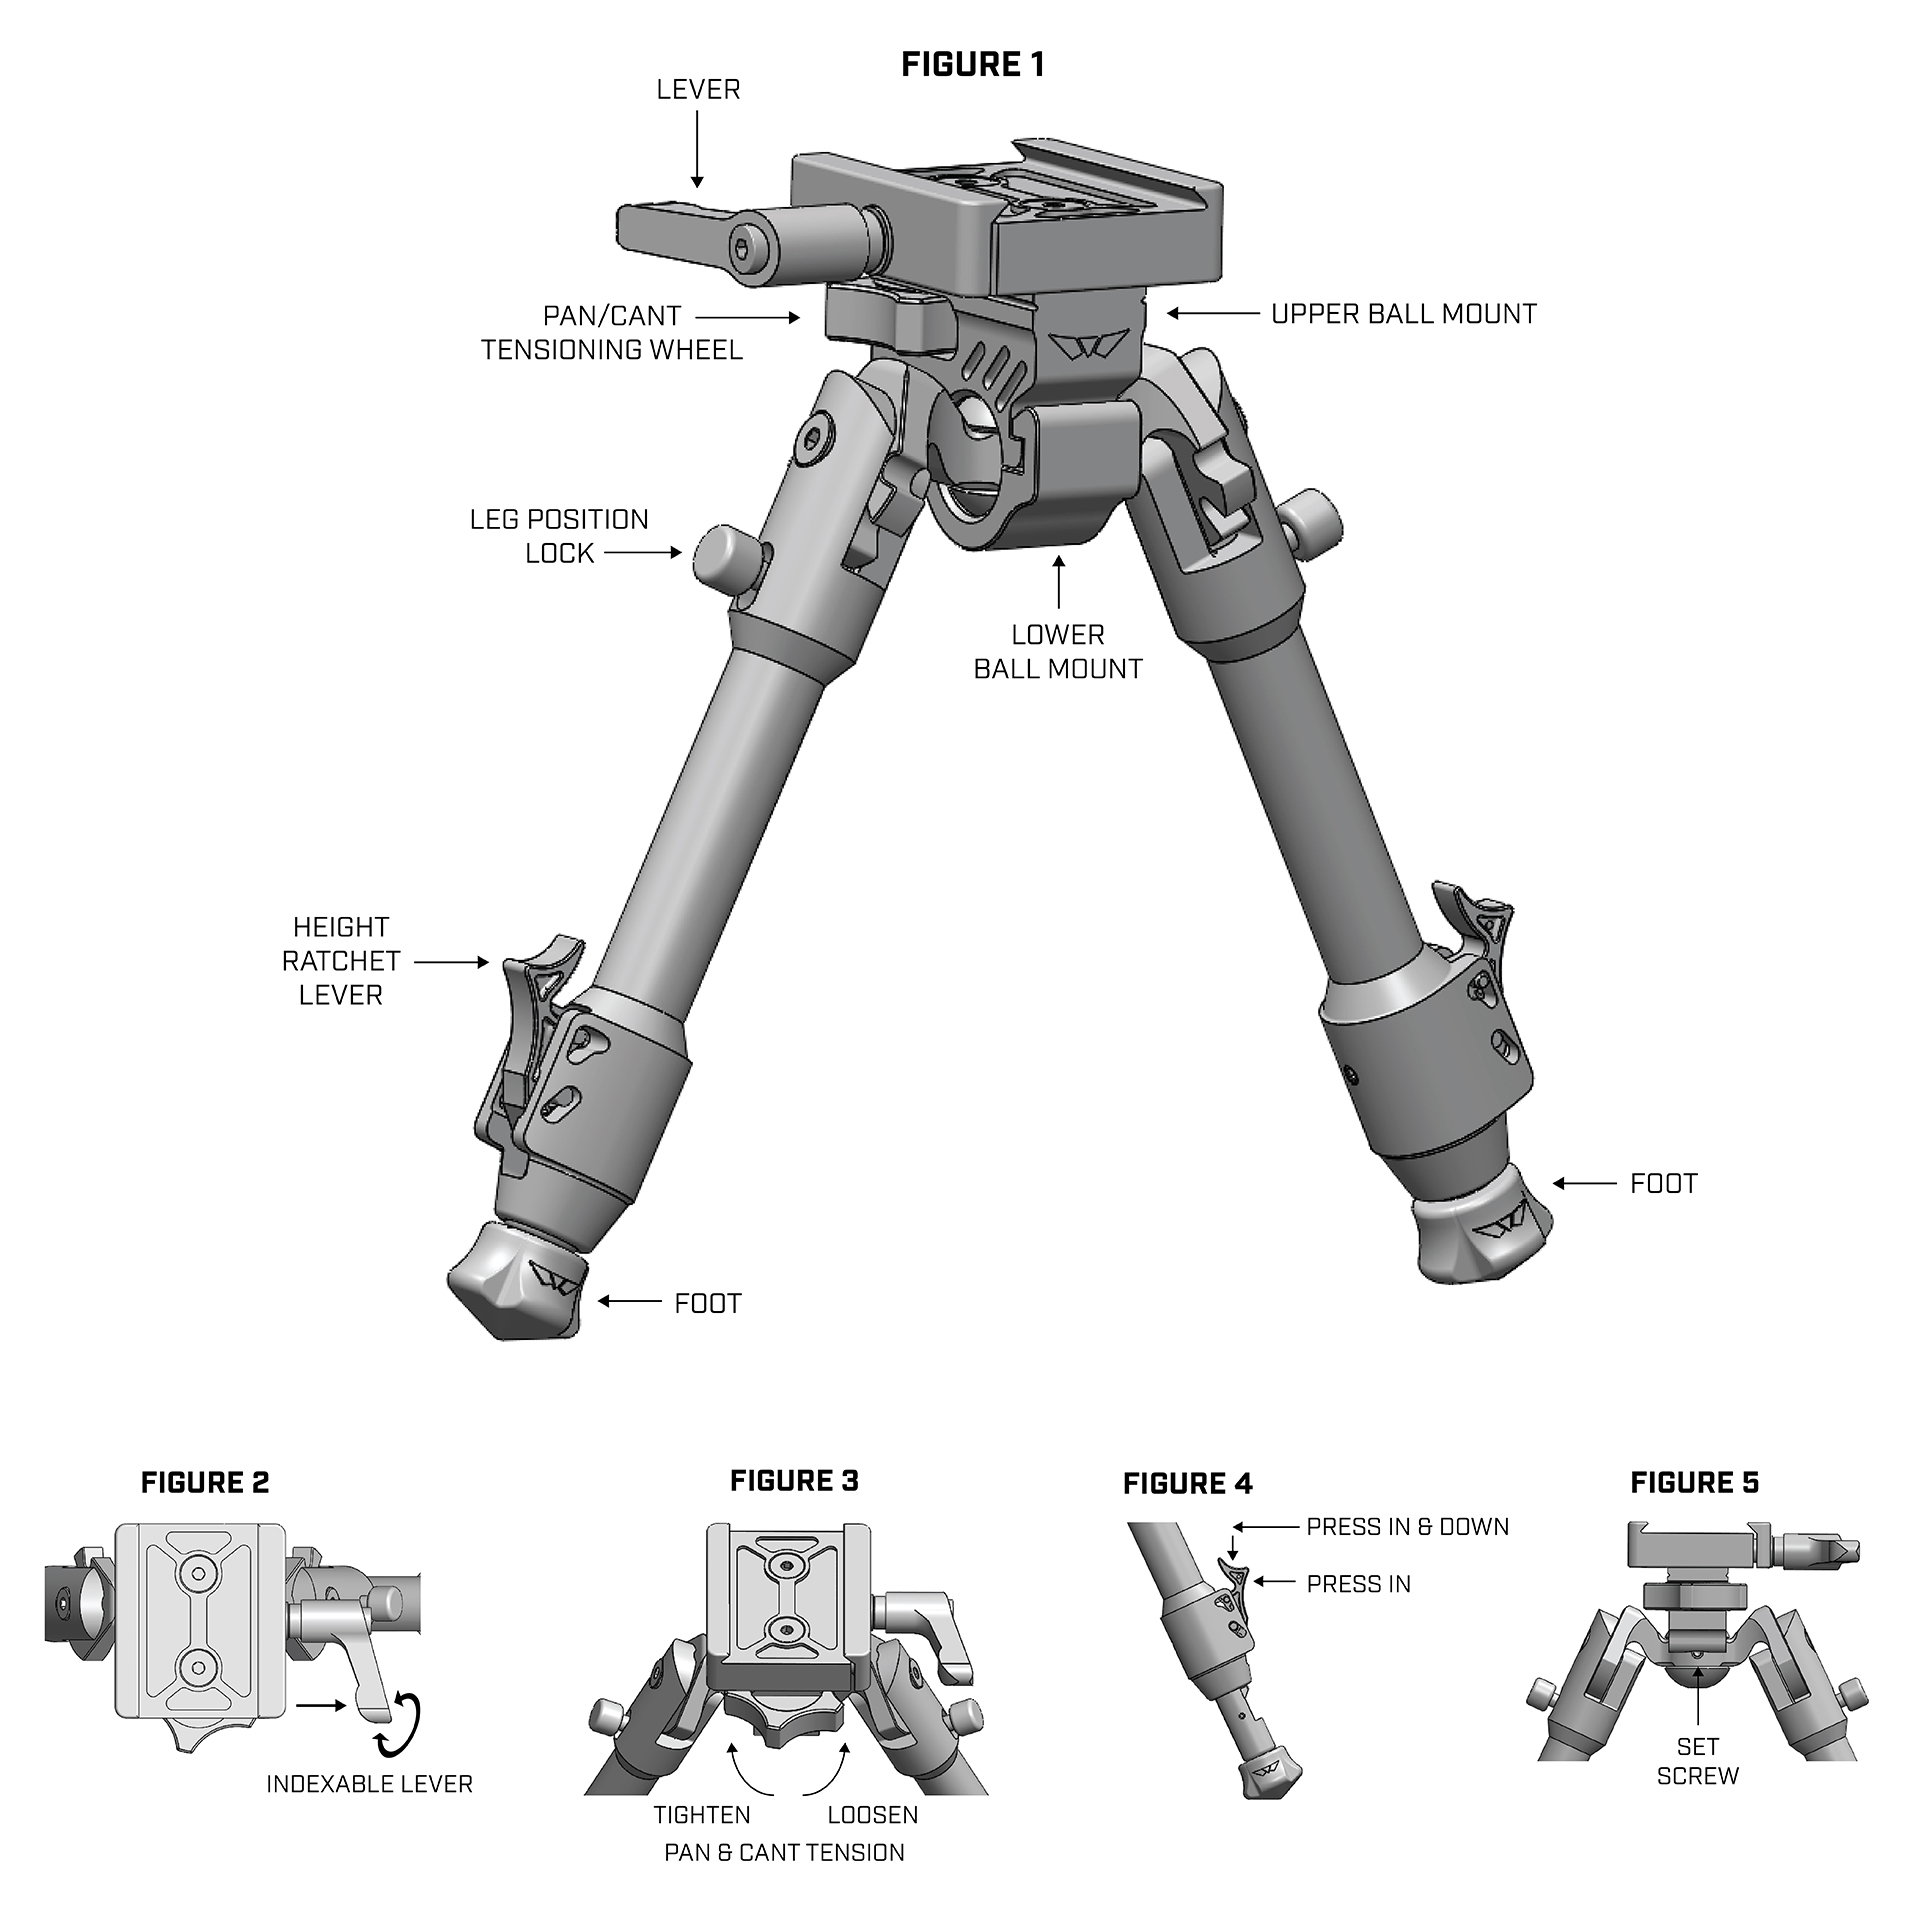
- ONLY INSTALL OR ADJUST BIPOD WITH MUZZLE POINTING IN A SAFE DIRECTION, DOWN RANGE.
- Loosen lever until the ARCA clamp will slide on OR clamp to ARCA rail with the logo facing forward (towards the muzzle). Do not loosen clamp more than 4 turns.
- Tighten lever until snug on ARCA rail in desired location.
- Lever may be indexed by pulling out and rotating lever left or right to desired position, then release lever to lock in place. See figure 2 (For those that desire the lever to be located on the right-hand side of the bipod: you may remove the 2 screws shown in Figure 2, and then rotate the ARCA clamp 180° and reinstall the screws to snug tight.)
- Using the Bipod: Rapid Deploy legs can easily lock at 90° from a resting position by pushing them down; legs can be adjusted by pressing down and holding the leg position lock and rotating to 0°, 45° or 90°, release lock and legs will lock at one of the three positions. See Figure 1
- To extend the Bipod legs, simply pull out to desired height, legs can be retracted one position at a time by pressing in on the height ratchet lever. To fully retract legs, press in on the ratchet lever AND while holding in, press down to retract. See Figure 4
- Pan and cant tension is adjustable, to adjust the tension (ease of movement) in the ball head, rotate the pan/cant tension wheel left to tighten and right to loosen. See Figure 3
- Disabling Pan Feature: Verify Bipod head is at 0°, (logo is facing forward, no pan angle).
- Turn pan/cant tension wheel to the right until tension wheel screw comes out, set tension wheel and screw aside.
- Press down on rear edge of lower ball mount and it will separate from top half, pan lockout set-screw will now be visible. With a 3/32nd allen, tighten set screw snug. See Figure 5
- Re-attach lower ball mount by hooking latch over front of upper ball mount, press up and into place. See Figure 1
- Insert tension wheel and screw, turning left until desired tension is applied to the ball head. Confirm tension wheel screw fits into square notch on lower ball mount.
IMPORTANT: NEVER OVER TIGHTEN ANY BASE OR RING SCREW. NEVER ATTACH A SCOPE IF THE OBJECTIVE TOUCHES THE BARREL OR CAUSES INTERFERENCE WITH THE BOLT, SAFETY OR CYCLING OF THE ACTION. ALWAYS FOLLOW THE FIREARM OR SCOPE MANUFACTURERS’ RECOMMENDED TORQUE SPECIFICATIONS. YOU ARE RESPONSIBLE FOR YOUR OWN GUNSMITHING METHODS.
If you are unsure or do not have the proper tools, please contact a gunsmith for assistance, Warne will not be held liable for stripped/damaged receivers or scopes.